博客

  • git设置忽略文件和目录

    1.登录gitbash命令端进入本地git库目录

    Administrator@PC201601200946 MINGW32 /d/gitrespository/crmweb (master)

    2.创建.gitignore

    3.修改文件,添加忽略正则

      .idea //忽略.idea文件夹及文件夹下文件

      *.iml //忽略以.iml结尾的文件


    【例子】

    # 忽略*.o和*.a文件

     *.[oa]

    # 忽略*.b和*.B文件,my.b除外

    *.[bB]

    !my.b

    # 忽略dbg文件和dbg目录

    dbg

    # 只忽略dbg目录,不忽略dbg文件

    dbg/

    # 只忽略dbg文件,不忽略dbg目录

    dbg

    !dbg/

    # 只忽略当前目录下的dbg文件和目录,子目录的dbg不在忽略范围内

    /dbg

    # 以'#'开始的行,被视为注释.

     * ?:代表任意的一个字符
        * *:代表任意数目的字符
        * {!ab}:必须不是此类型
        * {ab,bb,cx}:代表ab,bb,cx中任一类型即可
        * [abc]:代表a,b,c中任一字符即可
        * [ ^abc]:代表必须不是a,b,c中任一字符

    4.提交本地版本库,推送到远程项目,方便协作,项目管理

    添加忽略之后,已经提交到版本库中的文件是无法忽略的。只能clone到本地,删除后,再进行忽略。

    .gitignore只能忽略那些原来没有被track的文件,如果某些文件已经被纳入了版本管理中,则修改.gitignore是无效的。

     正确的做法是在每个clone下来的仓库中手动设置不要检查特定文件的更改情况。
     git update-index –assume-unchanged PATH    在PATH处输入要忽略的文件。
     另外 git 还提供了另一种 exclude 的方式来做同样的事情,不同的是 .gitignore 这个文件本身会提交到版本库中去。用来保存的是公共的需要排除的文件。而 .git/info/exclude 这里设置的则是你自己本地需要排除的文件。 他不会影响到其他人。也不会提交到版本库中去


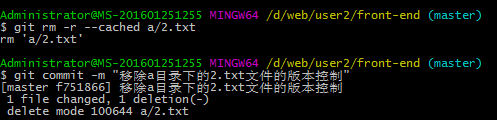
    其他操作:git删除远程仓库的文件或目录


    git rm -r –cached a/2.txt //删除a目录下的2.txt文件   删除a目录git rm -r –cached a

    git commit -m "删除a目录下的2.txt文件" 

    git push


    Note:

    用-r参数删除目录, git rm –cached a.txt 删除的是本地仓库中的文件,且本地工作区的文件会保留且不再与远程仓库发生跟踪关系,如果本地仓库中的文件也要删除则用git rm a.txt

  • /proc/cpuinfo 文件分析(查看CPU信息)


    # 总核数 = 物理CPU个数 X 每颗物理CPU的核数 
    # 总逻辑CPU数 = 物理CPU个数 X 每颗物理CPU的核数 X 超线程数
    
    # 查看物理CPU个数
    cat /proc/cpuinfo| grep "physical id"| sort| uniq| wc -l
    
    # 查看每个物理CPU中core的个数(即核数)
    cat /proc/cpuinfo| grep "cpu cores"| uniq
    
    # 查看逻辑CPU的个数
    cat /proc/cpuinfo| grep "processor"| wc -l
     

     查看CPU信息(型号)

    cat /proc/cpuinfo | grep name | cut -f2 -d: | uniq -c

     
    /proc/cpuinfo文件分析

      在Linux系统中,提供了proc文件系统显示系统的软硬件信息。如果想了解系统中CPU的提供商和相关配置信息,则可以通过/proc/cpuinfo文件得到。本文章针对该文件进行简单的总结。

      基于不同指令集(ISA)的CPU产生的/proc/cpuinfo文件不一样,基于X86指令集CPU的/proc/cpuinfo文件包含如下内容:

    processor  : 0
    vendor_id  :GenuineIntel
    cpu family  :6
    model    :26
    model name :Intel(R) Xeon(R) CPU           E5520  @ 2.27GHz
    stepping    :5
    cpu MHz    :1600.000
    cache size  : 8192 KB
    physical id  :0
    siblings    :8
    core id     : 0
    cpu cores   :4
    apicid         :0
    fpu       :yes
    fpu_exception :yes
    cpuid level   : 11
    wp      :yes
    flags      : fpu vme de pse tsc msr pae mce cx8 apic sep mtrr pge mca cmov pat pse36 clflush dts acpi mmx fxsr sse sse2 ss ht tm syscall nx rdtscp lm constant_tsc ida nonstop_tsc pni monitor ds_cpl vmx est tm2 cx16 xtpr popcnt lahf_lm
    bogomips   :4522.12
    clflush size  :64
    cache_alignment  : 64
    address sizes    : 40 bits physical, 48 bits virtual
    power management :

    以上输出项的含义如下:

    processor :系统中逻辑处理核的编号。对于单核处理器,则课认为是其CPU编号,对于多核处理器则可以是物理核、或者使用超线程技术虚拟的逻辑核
    vendor_id :CPU制造商     
    cpu family :CPU产品系列代号
    model   :CPU属于其系列中的哪一代的代号
    model name:CPU属于的名字及其编号、标称主频
    stepping   :CPU属于制作更新版本
    cpu MHz   :CPU的实际使用主频
    cache size   :CPU二级缓存大小
    physical id   :单个CPU的标号
    siblings       :单个CPU逻辑物理核数
    core id        :当前物理核在其所处CPU中的编号,这个编号不一定连续
    cpu cores    :该逻辑核所处CPU的物理核数
    apicid          :用来区分不同逻辑核的编号,系统中每个逻辑核的此编号必然不同,此编号不一定连续
    fpu             :是否具有浮点运算单元(Floating Point Unit)
    fpu_exception  :是否支持浮点计算异常
    cpuid level   :执行cpuid指令前,eax寄存器中的值,根据不同的值cpuid指令会返回不同的内容
    wp             :表明当前CPU是否在内核态支持对用户空间的写保护(Write Protection)
    flags          :当前CPU支持的功能
    bogomips   :在系统内核启动时粗略测算的CPU速度(Million Instructions Per Second)
    clflush size  :每次刷新缓存的大小单位
    cache_alignment :缓存地址对齐单位
    address sizes     :可访问地址空间位数
    power management :对能源管理的支持,有以下几个可选支持功能:

      ts:  temperature sensor

      fid:   frequency id control

      vid:  voltage id control

      ttp:  thermal trip

      tm:

      stc:

      100mhzsteps:

      hwpstate:


    CPU信息中flags各项含义:

    fpu: Onboard (x87) Floating Point Unit
    vme: Virtual Mode Extension
    de: Debugging Extensions
    pse: Page Size Extensions
    tsc: Time Stamp Counter: support for RDTSC and WRTSC instructions
    msr: Model-Specific Registers
    pae: Physical Address Extensions: ability to access 64GB of memory; only 4GB can be accessed at a time though
    mce: Machine Check Architecture
    cx8: CMPXCHG8 instruction
    apic: Onboard Advanced Programmable Interrupt Controller
    sep: Sysenter/Sysexit Instructions; SYSENTER is used for jumps to kernel memory during system calls, and SYSEXIT is used for jumps: back to the user code
    mtrr: Memory Type Range Registers
    pge: Page Global Enable
    mca: Machine Check Architecture
    cmov: CMOV instruction
    pat: Page Attribute Table
    pse36: 36-bit Page Size Extensions: allows to map 4 MB pages into the first 64GB RAM, used with PSE.
    pn: Processor Serial-Number; only available on Pentium 3
    clflush: CLFLUSH instruction
    dtes: Debug Trace Store
    acpi: ACPI via MSR
    mmx: MultiMedia Extension
    fxsr: FXSAVE and FXSTOR instructions
    sse: Streaming SIMD Extensions. Single instruction multiple data. Lets you do a bunch of the same operation on different pieces of input: in a single clock tick.
    sse2: Streaming SIMD Extensions-2. More of the same.
    selfsnoop: CPU self snoop
    acc: Automatic Clock Control
    IA64: IA-64 processor Itanium.
    ht: HyperThreading. Introduces an imaginary second processor that doesn’t do much but lets you run threads in the same process a  bit quicker.
    nx: No Execute bit. Prevents arbitrary code running via buffer overflows.
    pni: Prescott New Instructions aka. SSE3
    vmx: Intel Vanderpool hardware virtualization technology
    svm: AMD “Pacifica” hardware virtualization technology
    lm: “Long Mode,” which means the chip supports the AMD64 instruction set
    tm: “Thermal Monitor” Thermal throttling with IDLE instructions. Usually hardware controlled in response to CPU temperature.
    tm2: “Thermal Monitor 2″ Decrease speed by reducing multipler and vcore.
    est: “Enhanced SpeedStep”

    根据以上内容,我们则可以很方便的知道当前系统关于CPU、CPU的核数、CPU是否启用超线程等信息。

    查询系统具有多少个逻辑核:cat /proc/cpuinfo | grep "processor" | wc -l

    查询系统CPU的物理核数:cat /proc/cpuinfo | grep "cpu cores" | uniq

    查询系统CPU是否启用超线程:cat /proc/cpuinfo | grep -e "cpu cores"  -e "siblings" | sort | uniq

      输出举例:

        cpu cores    : 6
        siblings     : 6

      如果cpu cores数量和siblings数量一致,则没有启用超线程,否则超线程被启用。

    查询系统CPU的个数:cat /proc/cpuinfo | grep "physical id" | sort | uniq | wc -l

    查询系统CPU是否支持某项功能,则根以上类似,输出结果进行sort, uniq和grep就可以得到结果。

    【/proc/cpuinfo内容举例】

    1,Intel(R) Xeon(R) X5355

    processor  : 0
    vendor_id  : GenuineIntel
    cpu famil  : 6
    model     : 15
    model name  : Intel(R) Xeon(R) CPU           X5355  @ 2.66GHz
    stepping   : 7
    cpu MHz   : 2666.766
    cache size : 4096 KB
    physical id : 0
    siblings   : 4
    core id    : 0
    cpu cores  : 4
    fpu      : yes
    fpu_exception  : yes
    cpuid level   : 10
    wp      : yes
    flags    : fpu vme de pse tsc msr pae mce cx8 apic sep mtrr pge mca cmov pat pse36 clflush dts acpi mmx fxsr sse sse2 ss ht tm syscall lm constant_tsc pni monitor ds_cpl vmx est tm2 cx16 xtpr dca lahf_lm
    bogomips    : 5338.26
    clflush size    : 64
    cache_alignment : 64
    address sizes   : 36 bits physical, 48 bits virtual
    power management:
    
    processor    : 1
    vendor_id    : GenuineIntel
    cpu family    : 6
    model        : 15
    model name    : Intel(R) Xeon(R) CPU           X5355  @ 2.66GHz
    stepping    : 7
    cpu MHz        : 2666.766
    cache size    : 4096 KB
    physical id    : 1
    siblings    : 4
    core id        : 0
    cpu cores    : 4
    fpu        : yes
    fpu_exception    : yes
    cpuid level    : 10
    wp        : yes
    flags        : fpu vme de pse tsc msr pae mce cx8 apic sep mtrr pge mca cmov pat pse36 clflush dts acpi mmx fxsr sse sse2 ss ht tm syscall lm constant_tsc pni monitor ds_cpl vmx est tm2 cx16 xtpr dca lahf_lm
    bogomips    : 5333.75
    clflush size    : 64
    cache_alignment    : 64
    address sizes    : 36 bits physical, 48 bits virtual
    power management:
    
    processor    : 2
    vendor_id    : GenuineIntel
    cpu family    : 6
    model        : 15
    model name    : Intel(R) Xeon(R) CPU           X5355  @ 2.66GHz
    stepping    : 7
    cpu MHz        : 2666.766
    cache size    : 4096 KB
    physical id    : 0
    siblings    : 4
    core id        : 2
    cpu cores    : 4
    fpu        : yes
    fpu_exception    : yes
    cpuid level    : 10
    wp        : yes
    flags        : fpu vme de pse tsc msr pae mce cx8 apic sep mtrr pge mca cmov pat pse36 clflush dts acpi mmx fxsr sse sse2 ss ht tm syscall lm constant_tsc pni monitor ds_cpl vmx est tm2 cx16 xtpr dca lahf_lm
    bogomips    : 5333.67
    clflush size    : 64
    cache_alignment    : 64
    address sizes    : 36 bits physical, 48 bits virtual
    power management:
    
    processor    : 3
    vendor_id    : GenuineIntel
    cpu family    : 6
    model        : 15
    model name    : Intel(R) Xeon(R) CPU           X5355  @ 2.66GHz
    stepping    : 7
    cpu MHz        : 2666.766
    cache size    : 4096 KB
    physical id    : 1
    siblings    : 4
    core id        : 2
    cpu cores    : 4
    fpu        : yes
    fpu_exception    : yes
    cpuid level    : 10
    wp        : yes
    flags        : fpu vme de pse tsc msr pae mce cx8 apic sep mtrr pge mca cmov pat pse36 clflush dts acpi mmx fxsr sse sse2 ss ht tm syscall lm constant_tsc pni monitor ds_cpl vmx est tm2 cx16 xtpr dca lahf_lm
    bogomips    : 5333.68
    clflush size    : 64
    cache_alignment    : 64
    address sizes    : 36 bits physical, 48 bits virtual
    power management:
    
    processor    : 4
    vendor_id    : GenuineIntel
    cpu family    : 6
    model        : 15
    model name    : Intel(R) Xeon(R) CPU           X5355  @ 2.66GHz
    stepping    : 7
    cpu MHz        : 2666.766
    cache size    : 4096 KB
    physical id    : 0
    siblings    : 4
    core id        : 1
    cpu cores    : 4
    fpu        : yes
    fpu_exception    : yes
    cpuid level    : 10
    wp        : yes
    flags        : fpu vme de pse tsc msr pae mce cx8 apic sep mtrr pge mca cmov pat pse36 clflush dts acpi mmx fxsr sse sse2 ss ht tm syscall lm constant_tsc pni monitor ds_cpl vmx est tm2 cx16 xtpr dca lahf_lm
    bogomips    : 5333.67
    clflush size    : 64
    cache_alignment    : 64
    address sizes    : 36 bits physical, 48 bits virtual
    power management:
    
    processor    : 5
    vendor_id    : GenuineIntel
    cpu family    : 6
    model        : 15
    model name    : Intel(R) Xeon(R) CPU           X5355  @ 2.66GHz
    stepping    : 7
    cpu MHz        : 2666.766
    cache size    : 4096 KB
    physical id    : 1
    siblings    : 4
    core id        : 1
    cpu cores    : 4
    fpu        : yes
    fpu_exception    : yes
    cpuid level    : 10
    wp        : yes
    flags        : fpu vme de pse tsc msr pae mce cx8 apic sep mtrr pge mca cmov pat pse36 clflush dts acpi mmx fxsr sse sse2 ss ht tm syscall lm constant_tsc pni monitor ds_cpl vmx est tm2 cx16 xtpr dca lahf_lm
    bogomips    : 5333.68
    clflush size    : 64
    cache_alignment    : 64
    address sizes    : 36 bits physical, 48 bits virtual
    power management:
    
    processor    : 6
    vendor_id    : GenuineIntel
    cpu family    : 6
    model        : 15
    model name    : Intel(R) Xeon(R) CPU           X5355  @ 2.66GHz
    stepping    : 7
    cpu MHz        : 2666.766
    cache size    : 4096 KB
    physical id    : 0
    siblings    : 4
    core id        : 3
    cpu cores    : 4
    fpu        : yes
    fpu_exception    : yes
    cpuid level    : 10
    wp        : yes
    flags        : fpu vme de pse tsc msr pae mce cx8 apic sep mtrr pge mca cmov pat pse36 clflush dts acpi mmx fxsr sse sse2 ss ht tm syscall lm constant_tsc pni monitor ds_cpl vmx est tm2 cx16 xtpr dca lahf_lm
    bogomips    : 5333.69
    clflush size    : 64
    cache_alignment    : 64
    address sizes    : 36 bits physical, 48 bits virtual
    power management:
    
    processor    : 7
    vendor_id    : GenuineIntel
    cpu family    : 6
    model        : 15
    model name    : Intel(R) Xeon(R) CPU           X5355  @ 2.66GHz
    stepping    : 7
    cpu MHz        : 2666.766
    cache size    : 4096 KB
    physical id    : 1
    siblings    : 4
    core id        : 3
    cpu cores    : 4
    fpu        : yes
    fpu_exception    : yes
    cpuid level    : 10
    wp        : yes
    flags        : fpu vme de pse tsc msr pae mce cx8 apic sep mtrr pge mca cmov pat pse36 clflush dts acpi mmx fxsr sse sse2 ss ht tm syscall lm constant_tsc pni monitor ds_cpl vmx est tm2 cx16 xtpr dca lahf_lm
    bogomips    : 5333.68
    clflush size    : 64
    cache_alignment    : 64
    address sizes    : 36 bits physical, 48 bits virtual
    power management:

    2, Intel(R) Core(TM) i7 930 @ 2.80GHz

    processor	: 0
    vendor_id	: GenuineIntel
    cpu family	: 6
    model		: 26
    model name	: Intel(R) Core(TM) i7 CPU         930  @ 2.80GHz
    stepping	: 5
    cpu MHz		: 2807.024
    cache size	: 8192 KB
    fpu		: yes
    fpu_exception	: yes
    cpuid level	: 11
    wp		: yes
    flags		: fpu de tsc msr pae mce cx8 apic sep mtrr mca cmov pat clflush acpi mmx fxsr sse sse2 ss ht syscall nx lm constant_tsc rep_good nonstop_tsc aperfmperf pni est ssse3 cx16 sse4_1 sse4_2 popcnt hypervisor lahf_lm ida
    bogomips	: 5614.04
    clflush size	: 64
    cache_alignment	: 64
    address sizes	: 36 bits physical, 48 bits virtual
    power management:
    
    processor	: 1
    vendor_id	: GenuineIntel
    cpu family	: 6
    model		: 26
    model name	: Intel(R) Core(TM) i7 CPU         930  @ 2.80GHz
    stepping	: 5
    cpu MHz		: 2807.024
    cache size	: 8192 KB
    fpu		: yes
    fpu_exception	: yes
    cpuid level	: 11
    wp		: yes
    flags		: fpu de tsc msr pae mce cx8 apic sep mtrr mca cmov pat clflush acpi mmx fxsr sse sse2 ss ht syscall nx lm constant_tsc rep_good nonstop_tsc aperfmperf pni est ssse3 cx16 sse4_1 sse4_2 popcnt hypervisor lahf_lm ida
    bogomips	: 5614.04
    clflush size	: 64
    cache_alignment	: 64
    address sizes	: 36 bits physical, 48 bits virtual
    power management:
    
    processor	: 2
    vendor_id	: GenuineIntel
    cpu family	: 6
    model		: 26
    model name	: Intel(R) Core(TM) i7 CPU         930  @ 2.80GHz
    stepping	: 5
    cpu MHz		: 2807.024
    cache size	: 8192 KB
    fpu		: yes
    fpu_exception	: yes
    cpuid level	: 11
    wp		: yes
    flags		: fpu de tsc msr pae mce cx8 apic sep mtrr mca cmov pat clflush acpi mmx fxsr sse sse2 ss ht syscall nx lm constant_tsc rep_good nonstop_tsc aperfmperf pni est ssse3 cx16 sse4_1 sse4_2 popcnt hypervisor lahf_lm ida
    bogomips	: 5614.04
    clflush size	: 64
    cache_alignment	: 64
    address sizes	: 36 bits physical, 48 bits virtual
    power management:
    
    processor	: 3
    vendor_id	: GenuineIntel
    cpu family	: 6
    model		: 26
    model name	: Intel(R) Core(TM) i7 CPU         930  @ 2.80GHz
    stepping	: 5
    cpu MHz		: 2807.024
    cache size	: 8192 KB
    fpu		: yes
    fpu_exception	: yes
    cpuid level	: 11
    wp		: yes
    flags		: fpu de tsc msr pae mce cx8 apic sep mtrr mca cmov pat clflush acpi mmx fxsr sse sse2 ss ht syscall nx lm constant_tsc rep_good nonstop_tsc aperfmperf pni est ssse3 cx16 sse4_1 sse4_2 popcnt hypervisor lahf_lm ida
    bogomips	: 5614.04
    clflush size	: 64
    cache_alignment	: 64
    address sizes	: 36 bits physical, 48 bits virtual
    power management:
    
    processor	: 4
    vendor_id	: GenuineIntel
    cpu family	: 6
    model		: 26
    model name	: Intel(R) Core(TM) i7 CPU         930  @ 2.80GHz
    stepping	: 5
    cpu MHz		: 2807.024
    cache size	: 8192 KB
    fpu		: yes
    fpu_exception	: yes
    cpuid level	: 11
    wp		: yes
    flags		: fpu de tsc msr pae mce cx8 apic sep mtrr mca cmov pat clflush acpi mmx fxsr sse sse2 ss ht syscall nx lm constant_tsc rep_good nonstop_tsc aperfmperf pni est ssse3 cx16 sse4_1 sse4_2 popcnt hypervisor lahf_lm ida
    bogomips	: 5614.04
    clflush size	: 64
    cache_alignment	: 64
    address sizes	: 36 bits physical, 48 bits virtual
    power management:
    
    processor	: 5
    vendor_id	: GenuineIntel
    cpu family	: 6
    model		: 26
    model name	: Intel(R) Core(TM) i7 CPU         930  @ 2.80GHz
    stepping	: 5
    cpu MHz		: 2807.024
    cache size	: 8192 KB
    fpu		: yes
    fpu_exception	: yes
    cpuid level	: 11
    wp		: yes
    flags		: fpu de tsc msr pae mce cx8 apic sep mtrr mca cmov pat clflush acpi mmx fxsr sse sse2 ss ht syscall nx lm constant_tsc rep_good nonstop_tsc aperfmperf pni est ssse3 cx16 sse4_1 sse4_2 popcnt hypervisor lahf_lm ida
    bogomips	: 5614.04
    clflush size	: 64
    cache_alignment	: 64
    address sizes	: 36 bits physical, 48 bits virtual
    power management:
    
    processor	: 6
    vendor_id	: GenuineIntel
    cpu family	: 6
    model		: 26
    model name	: Intel(R) Core(TM) i7 CPU         930  @ 2.80GHz
    stepping	: 5
    cpu MHz		: 2807.024
    cache size	: 8192 KB
    fpu		: yes
    fpu_exception	: yes
    cpuid level	: 11
    wp		: yes
    flags		: fpu de tsc msr pae mce cx8 apic sep mtrr mca cmov pat clflush acpi mmx fxsr sse sse2 ss ht syscall nx lm constant_tsc rep_good nonstop_tsc aperfmperf pni est ssse3 cx16 sse4_1 sse4_2 popcnt hypervisor lahf_lm ida
    bogomips	: 5614.04
    clflush size	: 64
    cache_alignment	: 64
    address sizes	: 36 bits physical, 48 bits virtual
    power management:
    
    processor	: 7
    vendor_id	: GenuineIntel
    cpu family	: 6
    model		: 26
    model name	: Intel(R) Core(TM) i7 CPU         930  @ 2.80GHz
    stepping	: 5
    cpu MHz		: 2807.024
    cache size	: 8192 KB
    fpu		: yes
    fpu_exception	: yes
    cpuid level	: 11
    wp		: yes
    flags		: fpu de tsc msr pae mce cx8 apic sep mtrr mca cmov pat clflush acpi mmx fxsr sse sse2 ss ht syscall nx lm constant_tsc rep_good nonstop_tsc aperfmperf pni est ssse3 cx16 sse4_1 sse4_2 popcnt hypervisor lahf_lm ida
    bogomips	: 5614.04
    clflush size	: 64
    cache_alignment	: 64
    address sizes	: 36 bits physical, 48 bits virtual
    power management:

    【推荐资料】

    1,http://www.unixresources.net/linux/clf/program/archive/00/00/66/13/661380.html#article666843

      该参考资料为使用cpuid指令实际获取CPU信息代码,值得了解技术人士参阅

    2,http://www.richweb.com/cpu_info

      该参考资料列举了单核CPU情况下的cpuinfo文件、多核CPU使用超线程和不使用超线程的cpuinfo文件以及多个多核CPU情况下的cpuinfo文件,值得一看

    文章来源:https://blog.csdn.net/cuker919/article/details/7635488?utm_source=copy
  • linux 修改文件内容命令

    1、进入文件:vim 文件名 

    eg #vim /etc/httpd/httpd.conf

    2、查找待修改内容位置 :

    (1)shift+“:”,使文件变成可查询状态

    (2)输入 / +查询内容 (eg 查询Directory参数,即 /Directory)

    eg 找到Directory参数,注释掉Require all denied添加Require all granted

    3、找到位置后修改:按键盘 i 键 即变成可编辑状态

    4、修改文件内容后退出:按ESC键

    5、保存修改:

    (1)shift+“:”,使文件变成可查询状态

    (2)输入 wq!

    6、不保存修改:

    (1)shift+“:”,使文件变成可查询状态

    (2)输入 q!

  • Docker-PS命令解析

    查看 docker 容器,必然要用到 docker ps 命令。其基本格式为:

    docker ps [OPTIONS]

    关键在于 OPTIONS(选项):

    1

    常见用法

    1. 最常见的用法

    $ docker ps

    显示当前正在运行的容器。

    在 PORTS 一列,如果暴露的端口是连续的,还会被合并在一起,例如一个容器暴露了3个 TCP 端口:100,101,102,则会显示为 100-102/tcp。

    2. 显示所有状态的容器

    $ docker ps -a

    容器的状态共有 7 种:created|restarting|running|removing|paused|exited|dead。

    3. 显示最后被创建的 n 个容器

    $ docker ps -n 3

    注意,这里不限状态。

    4. 显示最后被创建的容器

    $ docker ps -l

    相当于 docker ps -n 1。

    5. 显示完整输出

    $ docker ps –no-trunc

    即不会截断输出。该选项有点长,其中 trunc 算是 truncate 的缩写。

    6. 只显示容器 ID

    $ docker ps -q

    清理容器时非常好用,filter 过滤显示一节有具体实例。

    7. 显示容器文件大小

    $ docker ps -s

    该命令很实用,可以获得 2 个数值:一个是容器真实增加的大小,一个是整个容器的虚拟大小。

    查看源码(https://github.com/moby/moby/blob/master/daemon/getsize_unix.go)后可知,容器虚拟大小 = 容器真实增加大小 + 容器镜像大小。

    2

    高级用法

    Filter 过滤显示

    如果容器数量过多,或者想排除干扰容器,可以通过 –filter 或 -f 选项,过滤需要显示的容器。

    当前支持的过滤条件非常丰富,包括:

    条件虽多,但万变不离其宗,只要再记住以下 3 条准则:

    1. 选项后跟的都是键值对 key=value (可不带引号),如果有多个过滤条件,就多次使用 filter 选项。例如:

    docker ps –filter id=a1b2c3 –filter name=bingohuang

    2. 相同条件之间的关系是或,不同条件之间的关系是与。例如:

    docker ps –filter name=bingo –filter name=huang –filter status=running

    以上过滤条件会找出 name 包含 bingo 或 huang 并且 status 为 running 的容器。

    3. id 和 name,支持正则表达式,使用起来非常灵活。例如:

    docker ps –filter name=^/bingohuang$

    精确匹配 name 为 bingohuang 的容器。注意,容器实际名称,开头是有一个正斜线 / ,可用 docker inspect 一看便知。

    docker ps –filter name=.*bingohuang.*

    匹配 name 包含 bingohuang 的容器,和 –filter name=bingohuang 一个效果。

    最后, 举一个复杂点的例子,用于清理名称包含 bingohuang,且状态为 exited 或 dead 的容器:

    docker rm $(docker ps -q –filter name=.*bingohuang.* –filter status=exited –filter status=dead2>/dev/null)

    Format 格式化显示

    如果想自定义显示容器字段,可以用格式化选项 –format 。

    基于 Go template(https://golang.org/pkg/html/template/)语法,可用的占位符如下:

    1. 当使用了 –format 选项,那么 ps 命令只会输出 template 中指定的内容:

    $ docker ps –format "{{.ID}}: {{.Command}}"

    a87ecb4f327c: /bin/sh -c #(nop) MA

    01946d9d34d8: /bin/sh -c #(nop) MA

    c1d3b0166030: /bin/sh -c yum -y up

    41d50ecd2f57:/bin/sh -c #(nop) MA

    2. 如果想带上表格列头,需要再 template 中加上 table 指令:

  • tmux常用命令及快捷方式

    使用Linux的时候,常常需要多个会话操作,这时候有个tmux工具可以在同一个会话中进行多窗口的显示,而且远程链接服务器的时候,会话断开,重连tmux,之前的操作还可以保留,某种意义上也提升了我们在Linux下开发的效率,故小编总结了一些tmux的安装、常用的快捷键及常用命令,如下:

    一、优点:

    1. 可以在单个会话窗口中,同时分割成多个窗口,相当于之前访问的多个会话。对于同时运行多个命令行程序很有用。
    2. 可以让新窗口"接入"已经存在的会话。
    3. 允许每个会话有多个连接窗口,因此可以多人实时共享会话。
    4. 还支持窗口任意的垂直和水平拆分。

    二、安装

    # Ubuntu系统
    sudo apt-get install tmux
    
    # CentOS
    $ sudo yum install tmux
    
    # Mac
    $ brew install tmux


    三、常用操作指令及快捷键[1]

    # 查看有所有tmux会话
    指  令:tmux ls
    快捷键:Ctrl+b s
    
    # 新建tmux窗口
    指  令:tmux new -s <session-name>
    
    # 重命名会话
    指  令:tmux rename-session -t <old-name> <new-name>
    快捷键:Ctrl+b $
    
    # 分离会话
    指  令:tmux detach  或者使用  exit(关闭窗口)
    快捷键:Ctrl+b d
    
    # 重新连接会话
    指  令:tmux attach -t <session-name>  或者使用 tmux at -t <session-name>
    
    #平铺当前窗格(个人很喜欢的快捷键,注意:平铺的是当前选中的窗格)
    快捷键:Ctrl+b z (再次 Ctrl+b z 则恢复)
    
    # 杀死会话
    指  令:tmux kill-session -t <session-name>
    
    # 切换会话
    指  令:tmux switch -t <session-name>
    
    # 划分上下两个窗格
    指  令:tmux split
    快捷键:Ctrl+b “
    
    # 划分左右两个窗格
    指  令:tmux split -h
    快捷键:Ctrl+b %
    
    # 光标切换到上方窗格
    指  令:tmux select-pane -U
    快捷键:Ctrl+b 方向键上
    
    # 光标切换到下方窗格
    指  令:tmux select-pane -D
    快捷键:Ctrl+b 方向键下
    
    # 光标切换到左边窗格
    指  令:tmux select-pane -L
    快捷键:Ctrl+b 方向键左
    
    # 光标切换到右边窗格
    指  令:tmux select-pane -R
    快捷键:Ctrl+b 方向键右


    四、常用命令[2]

    Ctrl+b激活控制台;此时以下按键生效!!!

    举个例子:
        帮助命令的快捷键是Ctrl+b ?
        它的用法是:在 Tmux 窗口中,先按下Ctrl+b,再按下?,就会显示帮助信息。

    系统操作

    ?	列出所有快捷键;按q返回
    d	脱离当前会话;这样可以暂时返回Shell界面,输入tmux attach能够重新进入之前的会话
    D	选择要脱离的会话;在同时开启了多个会话时使用
    Ctrl+z	挂起当前会话
    r	强制重绘未脱离的会话
    s	选择并切换会话;在同时开启了多个会话时使用
    :	进入命令行模式;此时可以输入支持的命令,例如kill-server可以关闭服务器
    [	进入复制模式;此时的操作与vi/emacs相同,按q/Esc退出
    ~	列出提示信息缓存;其中包含了之前tmux返回的各种提示信息

    窗口操作

    c	创建新窗口
    &	关闭当前窗口
    数字键	切换至指定窗口
    p	切换至上一窗口
    n	切换至下一窗口
    l	在前后两个窗口间互相切换
    w	通过窗口列表切换窗口
    ,	重命名当前窗口;这样便于识别
    .	修改当前窗口编号;相当于窗口重新排序
    f	在所有窗口中查找指定文本

    面板操作

    ”	        将当前面板平分为上下两块
    %	        将当前面板平分为左右两块
    x	        关闭当前面板
    !	        将当前面板置于新窗口;即新建一个窗口,其中仅包含当前面板
    Ctrl+方向键	以1个单元格为单位移动边缘以调整当前面板大小
    Alt+方向键	以5个单元格为单位移动边缘以调整当前面板大小
    Space	        在预置的面板布局中循环切换;依次包括even-horizontal、even-vertical、main-horizontal、main-vertical、tiled
    q	        显示面板编号
    o	        在当前窗口中选择下一面板
    方向键	        移动光标以选择面板
    {	        向前置换当前面板
    }	        向后置换当前面板
    Alt+o	        逆时针旋转当前窗口的面板
    Ctrl+o	        顺时针旋转当前窗口的面板

    tmux/screen rz/sz 文件卡死快速退出方法(tmux 暂不能使用rz/sz)

    • 按住Ctrl键, 再按五次x键 (强行终断传输)

    参考

    1. ^tmux使用教程 http://www.ruanyifeng.com/blog/2019/10/tmux.html
    2. ^tmux常用命令 https://www.cnblogs.com/lizhang4/p/7325086.html
  • Yii2 queue的队列使用详解

    一.基于redis

    1.安装redis ,并进行相关配置

    2.yii2 项目中使用composer 安装 yii2-redis

    3.yii2 项目中使用compsoer 安装yii2-queue


    1. 配置文件设置:

    2.  

    3. 'redis' => [

    4. 'class' => \common\components\cache\RedisCache::class,

    5. 'hostname' => 'localhost',

    6. 'port' => 6379,

    7. 'database' => 0,

    8. 'connectionTimeout'=>3

    9. ],

    10. /*'queue' => [

    11. //RabbitMq 队列方案

    12. 'class' => yii\queue\amqp\Queue::class,

    13. 'host' => '127.0.0.1',

    14. 'port' => 5672,

    15. 'user' => 'guest',

    16. 'password' => 'guest',

    17. 'queueName' => 'yii-queue',

    18. ],*/

    19.  


    20. 'queue' => [

    21.   //Redis 队列方案

    22. 'class' => \yii\queue\redis\Queue::class,

    23. // 连接组件或它的配置

    24. 'redis' => 'redis',

    25. // Queue channel key

    26. 'channel' => 'queue',

    27. 'as log'=> \yii\queue\LogBehavior::class,

    28. ],


    队列执行任务程序:


    1. 任务 一:

    2. <?php

    3. namespace services\queue\taskjob;

    4.  

    5. use services\queue\QueueTask;

    6. use yii\base\BaseObject;

    7.  

    8. class ReporttaskJob extends BaseObject implements \yii\queue\JobInterface

    9. {

    10. public $scene;

    11. public $content;

    12.  


    13. public function execute($queue)

    14. {

    15. //$transaction = \Yii::$app->getDb()->beginTransaction();

    16. echo "{$this->scene}".PHP_EOL;

    17. $saleSubjectServer = QueueTask::getSubject($this->scene);

    18. QueueTask::addObserver($saleSubjectServer,$this->scene,$this->content);

    19. //$transaction->commit();

    20.  


    21. }

    22. }


    1. 任务 二:

    2. <?php

    3. namespace services\queue\taskjob;

    4.  

    5.  

    6. use yii\base\BaseObject;

    7.  

    8. class TesttaskJob extends BaseObject implements \yii\queue\JobInterface

    9. {

    10.  

    11. public $name;

    12. public $content;

    13.  

    14. public function execute($queue)

    15. {

    16. //print_r($queue);

    17. echo "{$this->name}--{$this->content}".PHP_EOL;

    18. }

    19.  

    20. }


    发布队列任务:


    1. <?php

    2.  

    3. namespace console\controllers;

    4.  

    5. use services\queue\QueueTask;

    6. use services\queue\taskjob\ReporttaskJob;

    7. use services\queue\taskjob\TesttaskJob;

    8.  

    9. class QueuesController extends BaseConsoleController

    10. {

    11.  

    12. /**

    13. * 控制台运行命令:./console/yii-advanced queue/up-star

    14. * @return array

    15. */

    16. public function actionUpStar()

    17. {

    18. $this->doTestJob();

    19. $this->doReportJob();

    20.  

    21. }

    22.  

    23. private function doReportJob()

    24. {

    25. for ($i = 1; $i <= 10; $i++)

    26. {

    27. $randNum = rand(10,100);

    28. $job = new ReporttaskJob([

    29. 'scene' => QueueTask::SCENE_SALE,

    30. 'content' => ['id' => 'dapeng', 'name' => $i.'大鹏'.$randNum],

    31. ]);

    32. //延迟执行

    33. $res = \Yii::$app->queue->delay(2 * $i)->push($job);

    34. //无延迟执行

    35. //$res = \Yii::$app->queue->push($job);

    36. echo $res . PHP_EOL;

    37. }

    38. }

    39.  

    40. private function doTestJob()

    41. {

    42. for ($i = 1; $i <= 10; $i++) {

    43. $job = new TesttaskJob([

    44. 'name' => "{$i}-大鹏",

    45. 'content' => "{$i}-man",

    46. ]);

    47. $res = \Yii::$app->queue->delay(2 * $i)->push($job);

    48. echo $res . PHP_EOL;

    49. }

    50. }

    51. }


    队列正式执行命令:

    //执行发布任务

    ./console/yii-advanced queues/up-star 

    //执行监听队列

    console/yii-advanced queue/listen 

    console/yii-advanced queue/listen 5  //表示每隔5s监听一次队列

    console/yii-advanced queue/run            //运行队列任务直到空,一般用于定时cron

    console/yii-advanced queue/info         //查看队列状态

    //查看队列目前状态

    console/yii-advanced queue/info

    Jobs
      – waiting: 0    等待处理的消息对象
      – delayed: 6   延迟处理的消息对象
      – reserved: 0  从队列获取作业,并执行它
      – done: 387   已完成消息对象


    // 将作业推送到队列并获得其ID

    $id = Yii::$app->queue->push(new SomeJob());

    // 这个作业等待执行。

    Yii::$app->queue->isWaiting($id);

    // Worker 从队列获取作业,并执行它。

    Yii::$app->queue->isReserved($id);

    // Worker 作业执行完成。

    Yii::$app->queue->isDone($id);

    参考文献:https://www.yiiframework.com/extension/yiisoft/yii2-queue/doc/guide/2.1/zh-cn/usage

    如果worker使用PHP以外的东西实现,那么您必须更改序列化数据的方式。例如, JSON:


    1. return [

    2. 'components' => [

    3. 'queue' => [

    4. 'class' => \yii\queue\<driver>\Queue::class,

    5. 'strictJobType' => false,

    6. 'serializer' => \yii\queue\serializers\JsonSerializer::class,

    7. ],

    8. ],

    9. ];


    多生产多消费者

    多进程守护执行,每个队列可以均衡的分配,如果为了更加省心可以使用同步锁机制执行

    console/yii-advanced queue/listen


    为了进程持续有效不掉档启用。可以使用:supervisor 服务


    5. 启动/监听队列

    yii2 使用command命令启动队列 命令有:

    1. php yii queue/info

    查看目前去队列信息,主要是读取存储的数据,貌似yii2框架队列的数据一直会存储在redis中

    2. php yii queue/run

    直接运行队列,跑完后会终止进程

    3. php yii queue/listen

    监听队列,只要有新的队列过来就会处理,进程直到自行关闭才回退出

    • yii queue/clear//清空初始化
    • yii queue/run // 执行
    • yii queue/listen //监听队列
    • yii queue/info 来//队列状态

    yii queue/listen [wait]
    listen命令启动一个守护进程,它可以无限查询队列。如果有新的任务,他们立即得到并执行。
    wait是下一次查询队列的时间 当命令正确地通过supervisor来实现时,这种方法是最有效的。
    yii queue/run
    run命令获取并执行循环中的任务,直到队列为空。适用与cron。
    run与listen命令的参数:
    —verbose,-v: 将执行状态输出到控制台。
    —isolate: 详细模式执行作业。如果启用,将打印每个作业的执行结果。
    —color: 高亮显示输出结果。
    yii queue/info
    info命令打印关于队列状态的信息。

    6. 使用Supervisor将队列任务启动 添加到守护进程中

    推荐安装Supervisor,将 php yii queue/listen 等一系列队列进程,添加到进程保护中,防止中途崩溃时候,可以自救,哈哈~😄
    关于Supervisor,可以参考《centos安装Supervisor以及简单配置(添加进程守护)


    Redis队列

    queue.attempts: Hash   任务接收次数信息

    queue.message_id: String  任务总发布数量

    queue.messages: Hash 任务消息对象数据

    queue.reserved: Zset   

    queue.waiting: List     等待处理的消息队列 (消息对象数据来自 queue.messages,用key进行关联)

    queue.moving_lock:String   队列锁

    Redis队列监听执行

    RabbitMq队列监听执行【RabbitMq不支持失败重试一但失败整个对了将停止运行

    总结

    • 安装yiisoft/yii2-queue
    • 配置
    • 创建队列任务类
    • 控制器将数据添加到队列中
    • 启动/监听队列
    • 使用Supervisor将队列任务启动 添加到守护进程中


  • PHP实现敏感词过滤

    1、敏感词过滤方法
      
    /**
     * @todo 敏感词过滤,返回结果
     * @param array $list  定义敏感词一维数组
     * @param string $string 要过滤的内容
     * @return string $log 处理结果
     */

    function sensitive($list, $string){
      $count = 0; //违规词的个数
      $sensitiveWord = '';  //违规词
      $stringAfter = $string;  //替换后的内容
      $pattern = "/".implode("|",$list)."/i"; //定义正则表达式
      
      if(preg_match_all($pattern, $string, $matches)){ //匹配到了结果
        $patternList = $matches[0];  //匹配到的数组
        $count = count($patternList);
        $sensitiveWord = implode(',', $patternList); //敏感词数组转字符串
        $replaceArray = array_combine($patternList,array_fill(0,count($patternList),'*')); //把匹配到的数组进行合并,替换使用
        $stringAfter = strtr($string, $replaceArray); //结果替换
      }

      $log = "原句为 [ {$string} ]<br/>";
      
      if($count==0){
        $log .= "暂未匹配到敏感词!";
      }else{
        $log .= "匹配到 [ {$count} ]个敏感词:[ {$sensitiveWord} ]<br/>".
          "替换后为:[ {$stringAfter} ]";
      }

      return $log;
    }

    2、调用方法

    function testAction(){
      $string = 'likeyou小白喜欢小黑爱着的大黄'; //要过滤的内容
      $list = [‘小明’, ‘小红’, ‘大白’, ‘小白’, ‘小黑’, ‘me’, ‘you’];  //定义敏感词数组
      $result = $this->sensitive($list, $string);
      echo ($result);
      die;

      //打印结果:
      /*
      原句为 [ likeyou小白喜欢小黑爱着的大黄 ]
      匹配到 [ 3 ]个敏感词:[ you,小白,小黑 ]
      替换后为:[ like**喜欢*爱着的大黄 ]
      */
    }

  • Python 安装wheel包 安装lxml包

    看了网上很多方法,感觉看着迷迷糊糊的。于是自己找到个简单的方法安装了wheel和lxml。
    1.确定电脑python安装了pip
    打开pycharm 的setting的project目录下可以看到project interpreter
    可以看到自己python的安装的包

    2.下载安装wheel包
    (1)网站:
    Pypl资源搜索
    这是直接搜索的:
    https://pypi.org/project/wheel/

    (2)下载文件
    download files下下载 .gz压缩包,或者.whl

    3.安装wheel
    (1)下载的gz
    如果你下载的gz压缩包,直接解压,然后cmd进入目录,输入:
    python setup.py install
    回车,就可以安装完成
    (2)下载的.whl
    进入文件目录cmd,输入: pip install 文件名xxx.whl
    回车

    4.安装lxml
    (1)先下载文件
    https://pypi.org/project/lxml/#files
    注意自己Python的版本号,只有.whl文件

    (2)安装lxml.whl文件
    进入文件目录的cmd,输入pip install xxx.whl
    比如我的就是输入:pip intstall lxml-4.3.3-cp37-cp37m-win_amd64.whl

    总结:
    (1)gz文件,python setup.py install
    (2)whl文件,pip install 文件名

    OK,是不是很简单

    版权声明:本文为博主原创文章,遵循 CC 4.0 BY-SA 版权协议,转载请附上原文出处链接和本声明。

    原文出处:https://blog.csdn.net/qq_43472877/article/details/90141679

  • Python int与string之间的转化

    Python源代码:
    print('=========string 转 int==============')
    a52 = '12'
    print('十进制\'12\'转int ===>',int(a52),type(a52),type(int(a52)))
    print('十六进制\'12\'转int ===>',int(a52,16),type(a52),type(int(a52,16)))
    print('=========int 转 string==============')
    a55 = 18;
    print('十进制18转string ===>',str(a55),type(a55),type(str(a55)))
    print('十六进制18转string ===>',hex(a55),type(a55),type(hex(a55)))
    

    运行结果

    =========string 转 int==============
    十进制'12'转int ===> 12 <class 'str'> <class 'int'>
    十六进制'12'转int ===> 18 <class 'str'> <class 'int'>
    =========int 转 string==============
    十进制18转string ===> 18 <class 'int'> <class 'str'>
    十六进制18转string ===> 0x12 <class 'int'> <class 'str'>

  • PHP json_encode格式化下标不为0开始的数组会转为对象 解决方案

    $arr = array('a' , 'b', 'c');
    json_encode($arr);
    输出: ["a","b","c"]
    
    $arr = array('1' => 'a' , '2' => 'b', '3' => 'c');
    json_encode($arr);
    输出: {"1":"a","2":"b","3":"c"}
    
    如果仍然想转换为数组可使用sort函数排序
    $arr = array('1' => 'a' , '2' => 'b', '3' => 'c');
    sort($arr);
    json_encode($arr);
    输出: ["a","b","c"]


    原文链接:https://blog.csdn.net/maisiji_cn/article/details/84338155